Tuesday, March 18, 2014

BMP-1: Card Model


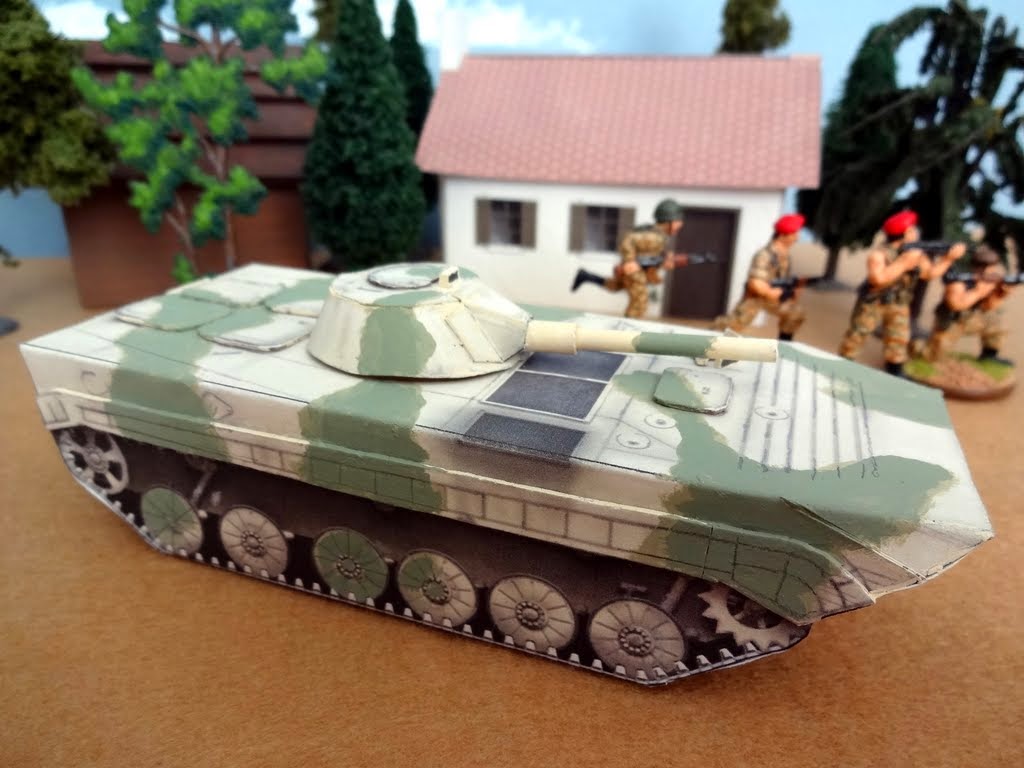
Here's a card model I built recently, Paper Forge's BMP-1.  The default scale is 1/48, a bit small relative to my troops which are more 40mm (give or take a few millimeters).  However, 1/48 and 1/43 armor & vehicles fit the size of the soldiers well enough for my purposes.

This and other models such as the T-72, Abrams tanks and the Humvee can be found at Wargamer Vault, PDF file downloads for the princely sum of $1.99.  Not bad at all considering that once you have the files, unlimited vehicles can then be fabricated at no additional cost.  The parts sheets have a helpful conversion table giving the % of print scale to make the models as anything from 1/35 to 1/144. 

For the Russian vehicles, the files come with two different versions, green and tan. The US comes in woodlands camo and tan. The Russian green is nice, with the appearance of mud on the tracks and hull. But the details on the tan version look a little crisper to me.  In the case of the BMP, everything fits on one parts sheet.


This is a very well designed kit. Very simple to build, yet sturdy. The braces keep the hull true so that the tracks sit flush once you've completed the build.


And the end result.  Yes, it's simplified in that there are no headlights, the tracks aren't flared out away from the hull and so on.   But I think it captures nicely the look of the cramped sardine can for infantry that is the Boyevaya Mashina Pekhoty.  In any case, detailed or not it works just fine in my simple imagi-nations context.

I did some things to it, substituted a styrene cannon barrel (although you could just as easily go with the rolled paper), styrene driver's/TC's optics, used an extra parts sheet with cereal box cardboard-backed hatches and fenders to make the details pop a little more.  And I painted the green camo pattern.  Water is death to paper models, but you can get away with using water-based paint on them providing you dry the brush thoroughly after rinsing. The 40mm HLBS crew figure shows the vehicle is a bit undersized, but not outlandlishly so.


I'm now nearly finished with the T-72 and will post about it soon.

Saturday, March 15, 2014

PA Cavalry Conversion 2: 40mm Home Casting


Finally got around to painting the first casting from the modification of the Prince August cavalry figure.  Conversion on the left, original on the right:


The verdict ?  I have mixed feelings about this. The horse and the rider's coat show minor improvements.  But to my eyes, it looks like bulking up the hat was a mistake.  In the abstract, it wasn't a bad idea to fix the rider's flattish tricorne.  However I missed something when enumerating the figure's flaws:  not only the horse's head is too big, so is the rider's. What I did here only accentuated it.

Still an okay figure but I'm not excited about it.  May hold off for a bit to see what Prince August unveils in the new range of 7YW molds, hopefully some nice cavalry is in the offing.

Wednesday, March 12, 2014

Airfix Modern British Infantry: 1/48 Plastic


I recently purchased a box of Airfix modern infantry with the idea of using them with my Green forces.  On paper, this seemed like a good idea as my few 1/48 HLBS modern infantry figures (a range now sadly defunct) match pretty well with the other figures I have.  The back of the box image sold me on the purchase. The poses are fairly static in patrolling mode but there looked to be some useful guys in the box.


The raw materials.  The figures aren't multi-part in the sense of having a lot of options right out of the box, although not doubt some customization can be done.  Things fit well enough together (except for the scrawny necks), although the arms aren't clearly defined as to what angle they need to be mounted in order to grasp the spindly assault rifles. Using plastic model glue there's time to make adjustments before it sets, super glue is a lot more problematic in that respect.


As soon as I saw the size of the parts, I knew I had a problem.  From left to right, Airfix, HLBS, plastic army guy:


The Airfix soldier measures 33mm from the boots to the eyes, HLBS is 38mm.  Seems hard to believe a major model company could muff the scale, so we can say then that the HLBS were "heroic" 1/48, a virtual 40mm. Still, I'm curious how the Airfix might scale up against the Tamiya 1/48 WW2 figures, although I'm not about to purchase a box purely in the interest of research. 

Despite his deformity, Private Pencil Neck somehow passed the army's physical exam.
No, they just won't do.    

Thursday, March 6, 2014

Cloning a Clone: Plastic Army Guys


Everyone has seen them, those ubiquitous bags of cheap plastic made-in-China clone soldiers hanging on the rack in seemingly every supermarket and drug store in the US.  Do kids even play with these anymore ?  Maybe just big kids like us.  As often as not, they're 35-45mm knockoffs of their 54mm plastic army men brethren, the Airfix or Timmee roots clear to see. I've posted about them before.

Inspired by the engrossing series Jono's World at the Archduke Piccolo blog, I decided to to take another crack at these.  In this case, I modied one of the figures for the evil Tan forces. The raw materials in this bag are two main types of soldiers.  The Vietnam era guys seem to be copies in the Timmee style. But others look like British WW2 infantry from the neck down, capped off with US M1 style steel pots.  This helmet had a good long run from WW2 until the Fritz in the mid-80's, wore one myself (now over 40 years ago, wow !).


Here is the candidate figure, selected for his appealing and useful assaulting pose.  The main change was was substituting an AK for his WW2 rifle (Enfield ?), brass wire for the barrel and green stuff magazine and front sight.  That and giving him boots for a more Russian sort of look, plus a rucksack to cover the old-fashioned web gear.


And for added strength and repeatability, made a mold to cast the figure in metal.


The result ?  Not too bad and he certainly meets my needs.


The BMP in the background is a cheap and simple paper model. More about this in a subsequent post. For now, I'm belatedly painting the first example of the modified cavalryman.

Friday, February 21, 2014

PA Cavalry Conversion: 40mm Semi-Rounds


I had hoped to show more painted results of the latest figure conversion but had a setback in the mold making stage of the process, more about which later.  For now, the story begins with Prince August cavalry.  While we're relatively spoiled for choice with the infantry, there are four main cavalry trooper figures which can be cast.  First we have good old PA11 and the identical pose in its newer, more fully rounded version:


This seems to be the hands down favorite, and we also see a very similar figure as the mainstay of everyone's Spencer Smith cavalry arm.  I like this one but he looks very Swedish to me in style and the hell-for-leather charge was probably not the norm for most armies' cavalry doctrine of the era. And of course we have the pistol wielding PA48 and the nice, but rather static dragoon PA41. 

Both these latter figures certainly have their uses, but sticking to sword-armed cavalry it comes down to Molds # 11 or Mold # 935 painted in his "Wild Geese" livery in the top photo. # 935 seems to be not nearly as popular, perhaps in part due to difficulty in casting the sword fully.  Further, there are things about the figure which are not quite right. The horse's head looks oversized, the hind quarters a bit skimpy and angular, the pistols oddly mounted forward and too low on the body instead of up near the saddle.  But I do very much like the pose, so let's see what can be done here:


As can be seen in the comparison shot, what I have done to the rider is bulk up the flattish tricorne, also give him a fuller coat and cuffs.  I beefed up the sword a bit to get a stronger cast, with the intention of filing it after casting.  The horse and tack get some attention as well: among other things, filed down the head a little, added more definition to the hind quarters, amputed the pistol holsters and replaced with green ones.

So far so good, I think.  Last weekend I made a new mold with eager anticipation of casting and painting this new figure.  The first half came out fine. Unfortunately, had a bit of a disaster where a small portion of the second mold have stuck to the first despite the use of mold separation cream. Evidently I missed a spot. And this damage fell right across part of the horse, ruining the castings.  Why not just re-do the second half, you ask ?  Good question !  And I would have done so but for the lack of sufficient RTV compound. Rather than taking the sensible course of ordering more and waiting, I tried patching the 2nd half, would up cutting extra channels in the original half as a work-around and to sum up, botched the whole thing.  So we're a week or two away from seeing this figure actually painted.

In the meantime, I've also started on the infantry command figures. The standard bearer is finished, the drummer just under way. I'll soon show these in subsequent postings.  

Friday, February 7, 2014

Transforming a Swede to a Frenchman - 40mm Semi-Rounds


I've often wished that Prince August could have done better of creating a French infantryman than the Battle of Rossbach mold PA58.  Of course, there is also the "French Regiments of 1750" and "Wild Geese" series of molds.  But they are very much a case of old wine in new bottles, Karoliners sold with painting guides as French troops. Of course, I painted a regiment of these years ago. 

And a Swiss battalion Courten made from GNW molds.  A little better, but still essentially Danes or Russians in disguise.
 

In any case, following up on the previous post, it was time to try something more ambitious.  My objective was two-fold. First, I wanted a more convincing French infantry figure for my 40mm armies.  Secondly, I wanted it in the always useful "march attack" pose.  Did I have the sculpting talent to make one ?   Who knows, and what were the chances of creating a tolerably good figure the first time out ? 

Hedging my bets, I decided to use a PA casting as the base figure upon which to add green stuff to build up a suitable master.  For this, I chose the advancing musketeer PA14,  the hat company counterpart to the previously featured grenadier figure. 


Again, this is one of the older, flatter Eriksson molds without precise detail.   The idea was to substantially rework the figure, but take advantage of the good proportions and aggressive advancing stance.  I cut off the weapons, amputated his arms and filed down the coat to a bare outline.  I then started to rebuild the figure with green stuff. And here and there, I used existing bits from other figures such as the musket and scabbards.


My main worry was getting the arms to appear natural, hoping to hit a happy medium between T.rex and orangutan. That and just getting the general "look" right.  And the new master.


It looked pretty good to me, but the proof would be in the casting. My 1st mold went wrong when the master must have slipped somehow, resulting in an ugly seam down the middle of the figure.  The 2nd mold worked better but once I got castings out of it, I saw that there were a few things which needed to be tidied up on the master. The 3rd mold works the best except the bayonet scabbard casting short.  But by no means a deal breaker. In any case, this flow pattern is effective and the bayonet at the extremity casts fully every time.


And more painted figures.  It would have been preferable to finish more but I was eager to share it.


How did it turn out ?  Once done with something like this, after the initial delight of creation wears off you tend to see all the flaws.  I'm looking forward to reading any and all constructive criticism but I have to say I'm pleased with the result.

Saturday, February 1, 2014

Backdating a PA Grenadier - 40mm Home Casts


Readers of this blog will know my mixed feelings of joy and frustration when it comes to the Prince August range of 40mm semi-rounds, as in this previous post: War of the Polish Succession.  Holger Eriksson's many excellent figures are a great tribute to the Swedes of the GNW, but not necessarily ideal for all among us with designs on using them for other armies both real and imaginative.  When it comes to toy soldiers and music, my tastes run more to the Baroque than the Classical.  Aside from the old-fashioned shoes/stockings and hair styles, the PA's remind me more of Frederick the Great's Prussians than WSS era soldiers.

And as the Irish Prince August mainly perpetuated more Karoliners with recent additions to the 40mm home casting range, it's high time to take matters into my own hands.  Quite belatedly, I have discovered the utility of Green Stuff, and even more recently - mold making.  I took the plunge last month and bought a hobby molding kit from Reb Toys.  It consists of a wooden mold making jig, two jars of Quick-Sil, "RTV jewelry molding rubber" compound, and a container of Castaldo mold separation cream.

My first mold-making experiment made use of a Spenkuch semi-round as the master.  The failure was comically bad: the poor fellow's lower body and legs cast nicely but his headless Swiss cheese upper body looked as if he'd walked into a perfect storm of grapeshot.  It was readily apparent that more pressure was required during the mold curing process and that's probably what those two wing-nuts on top of the jig were for.  For test Mold #2, I emulated Tony Bath in using a flat Zinnfigur as the master.  Not perfect but definitely better.  In the interest of maintaining harmonious relations with Germany I'll say no more about it when sooner or later a battalion or two of these guys shows up here on the blog.

Now that I'd established that I could indeed create a functional mold, it was time to move on to the objective of modifying a Prince August figure.  For this, I selected the grenadier mold PA20.  He is one of the older, flatter original Eriksson creations. It's a good and simple figure with the musket casting directly on the centerline.  As can be seen in the top photo, all I did here was to file off the turnbacks and bulk the coat and cuffs with green stuff.  My mold is nothing fancy, using very similar flow channels to the PA original.  The wing nuts on the jig soon stripped out, but I found the brutal expedient of setting a 3-ton floor jack on top of the jig during curing compresses the silicone rubber rather effectively.


Here I've painted the figure as an Austrian grenadier, suitable for 1700-1735.


And next to his original, more 7YW-looking cousin.


Soon to follow, a more ambitious and exciting conversion !